Into the Woods With Pastel and Graphite
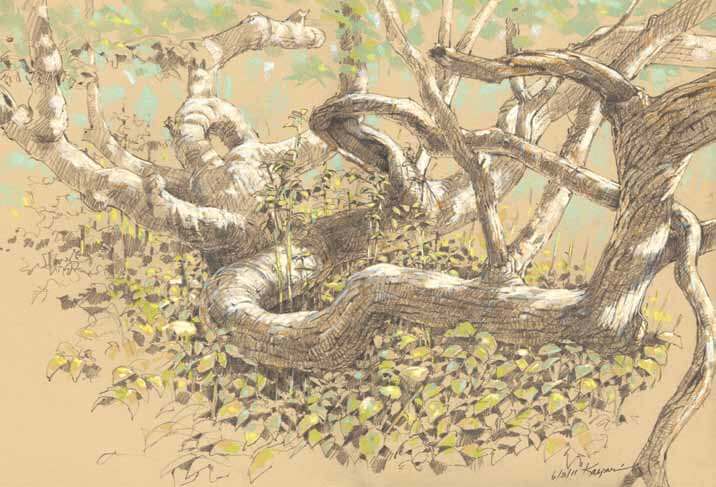
Artists have employed a combination of chalk or pastel with graphite for line drawings on toned paper for centuries. Learn how to use the technique to deliver striking dimension and add color to forest scenes.
by Debby Kaspari

In 2008, my husband and I made a plan to live in a forest in Massachusetts for six months. Among other things, I saw it as a perfect chance to focus on a mixed-media approach I’d been playing with: combining pastel and graphite.
When we arrived at our forest home in early spring, snow still clung in patches under the bare trees, but I immediately set out on a hike and started drawing. Since then, I’ve used this technique for drawing in tropical Panama, in the Amazon rainforest and among Oregon’s old-growth giant firs. It’s a wonderful method for portraying the intricate patterns of forest interiors.
Related: See a demo of Debbi’s plein air setup and technique
Member Exclusive
Artists Network members had an exclusive opportunity to attend a live virtual artists talk and demonstration with Debby. Log into your membership to view the playback here!
The Technique
I use graphite and pastel en plein air, but the technique can be equally effective in the studio, and you don’t need a lot of pastels; a handful can provide plenty of values and a good range of color. The paper sets the middle tone and unifies the piece while the graphite delivers volume, shadows and darks.


1: Start with Graphite Outlines.
Working on a sheet of lightly toothed, toned paper, begin by establishing outlines, shaded areas and darks, using a soft graphite pencil. Draw with loosely scribbled, scumbled or crosshatched lines, reserving open spaces for pastel touches in some places and allowing for the tone of the paper to show through in others. Remember, the graphite creates your darkest value.

2: Add Pastel.
Smudge, blend, push and pull, but avoid layering over the graphite’s slick surface, as it repels pastel. Be sure to use pastels that are lighter in value than the graphite. Experiment. Play with papers in various mid-tones, colors and textures.

3: Set the Scene.
Work with your materials to set the scene. If it’s a shady forestscape, darker paper gives instant depth and brighter highlights. Warm tan paper resonates with cool pastels. Cool gray paper comes alive with warm terra cottas, yellows and greens. In this technique, paper is your middle value, graphite is your structure and darkest dark, and pastel brings color and value—plus some zest—to the picture.

The Materials
Papers
I use a variety of papers: Rives BFK, in tan or gray; Hahnemuhle Ingres; Canson Mi-Tientes and Fabriano Tiziano—all of which hold pastel well but aren’t so toothy that pencils can’t make clean lines. The paper’s color and tone establish the key and unite the composition. Avoid white paper, which is too pale, and sanded paper, which wears down pencils.

Pencils
Soft, dark Nos. 4B through 9B pencils, graphite bars or leads in lead holders work best. My favorite is the Koh-I-Noor Hardtmuth Triograph No. 6B. It’s a terrific pencil, but it doesn’t fit in most two-hole pencil sharpeners and, therefore, requires an extra-large diameter sharpener. Some artists sharpen it with a knife, but I’ve discovered that drugstore eyeliner and lip-liner sharpeners work great. Go to the makeup counter with a Triograph and check for the best fit. If you need to erase, do so gently with a kneaded eraser. Some of these papers don’t tolerate heavy erasing.
Pastels
Hard to medium-soft pastels work best. Nupastels, Faber-Castell Goldfaber Studio pastel sticks and Holbein pastels are my favorites. Very soft pastels should be used sparingly as they tend to overfill the paper’s tooth. You’ll need both light and medium values, a few grays and some saturated brights. Don’t use pastels that are any darker in value than the graphite. I prefer muted colors for nature scenes: yellow ochres, warm and cool grays, rusts, pale turquoises, yellow and blue-greens, creams, mauves, ultramarine, light cobalt blue, dusty rose, white, and light and mid-value browns. I use pieces of pastel that are about 1-inch long or shorter, turned sideways, for nice, wide strokes.
Equipment
When making large plein air drawings, using a wood or Masonite board will provide strong backing. Use a sturdy easel that angles back or flat, such as a French box easel or Jullian Rexy watercolor easel. If you’re working smaller, a drawing board on your lap and a folding chair will suffice.
Keep your loose paper in a folio with glassine sheets that you can place in between finished drawings. I carry my materials in a portfolio tote bag. A small backpack can hold your pencils, pastels, masking tape, binder clips, a small sketchbook for thumbnails and, if you like, something on which to rest your hand to prevent smudging. I use a clean peanut butter jar lid. A plein air umbrella is optional, but can be handy for diffusing patchy light under trees.
Dos and Don’ts
- Don’t layer pastel on top of graphite (but you can draw graphite on top of pastel).
- Do leave gaps in the drawing for added color and highlights.
- Don’t use papers or pastels that are darker than your darkest graphite value.
- Do leave some paper showing through; its tone and color unifies the picture.
About the Artist
Debby Kaspari explores the natural world with pencil and paper. When not working directly from nature, she can be found drawing from high atop a one-story bungalow in the middle of Oklahoma.
This article contains affiliate links that help us earn a small commission from purchases — at no additional cost to you. We are grateful for your support.
More Resources from Debby Kaspari
How to Draw Birds: 8 Techniques and Tips
5 Ink Drawing Techniques for Plein Air
Fearless Fieldwork: A Live Discussion and Demo for Artists Network Members



Join the Conversation!