Hand Drawing Made Simple: Key Techniques for Confident Results
Drawing hands is one of the most popular topics learning artists ask about. That’s because knowing how to draw hands is essential if you are drawing the figure. But it can also be intimidating. That’s why I want to share with you this article on hand drawing made simple from one of our favorite instructors, Brent Eviston. The tutorial breaks down the essential steps without overwhelming you! If you have an “ah-ha!” moment, that’s to be expected! Enjoy!
My Approach to Hand Drawings
Drawing the human hand takes almost as much knowledge, skill and experience as drawing the entire rest of the figure. However, when drawing the hand, you can adapt many of the same tools and techniques you’re already using to draw the rest of the figure. In this article, I will walk you through a few key ways to approach hand drawing so you can enhance your skill set and create more confident drawings.
Gesture Drawings of the Hand
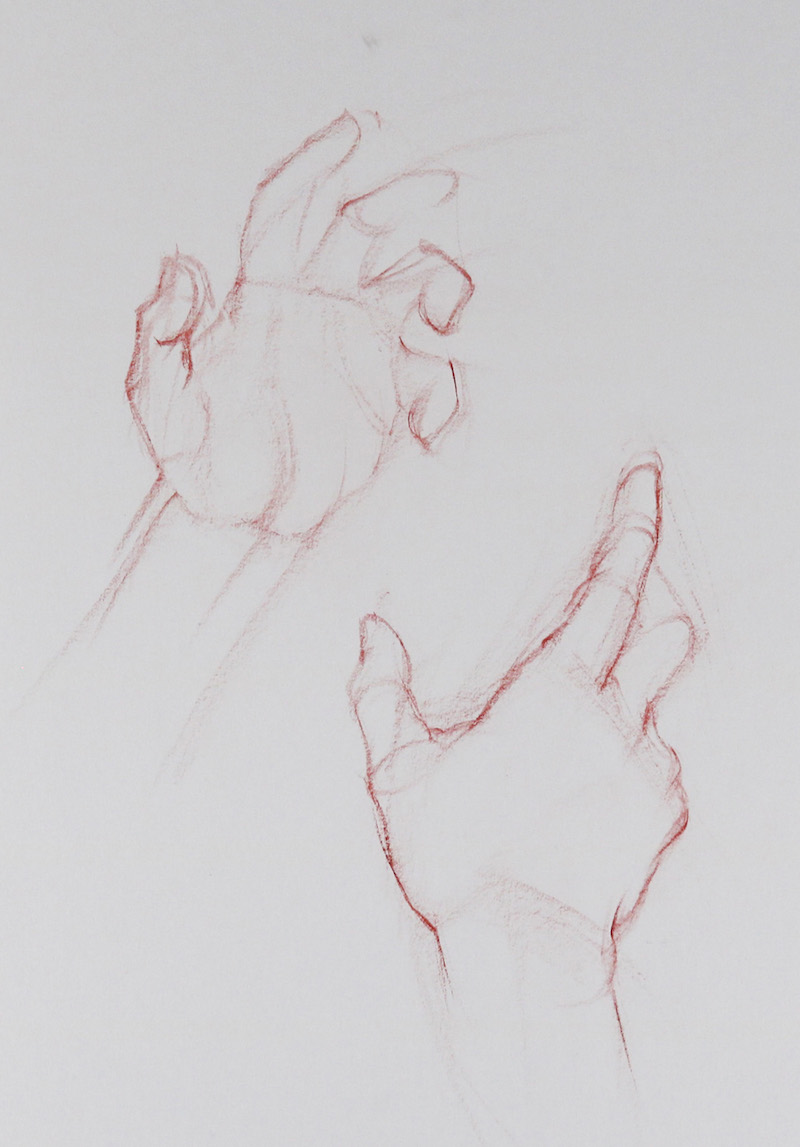
Gesture drawing is a foundational figure drawing skill. Although you can approach gesture drawings in many ways, most strategies involve doing quick drawings (anywhere from 10 seconds to five minutes) that simplify the subject into as few strokes as possible, as well as favor dynamism over accuracy and large, general forms over small details. When doing gesture drawings of the full figure, axis lines are used to capture the angle between a pair of landmarks on the body, most often of the hips or shoulders. In the drawing below you’ll see how you can use a combination of dynamic directional marks and axis lines to capture the angle of the wrist as well as the line of the knuckles. This is an excellent way to quickly capture the most prominent forms and proportions of the hand. Remember, your gesture drawing will lay a light foundation upon which you’ll build the rest of your drawing, so start off as lightly as you can.

The Radius Line
When beginning a gesture drawing, start with the radius side of the wrist (the side with the thumb). In the drawing on the left (fig. 1), a line moves from the radial side of the wrist all the way up to to the tip of the pointer finger, ignoring the thumb. If the radial side of the wrist and the pointer finger aren’t easily visible, you can switch to drawing the ulnar side of the wrist to the pinky finger. Pay particular attention to where this line changes direction.
Axis Lines
When gesturing the hands, axis lines can be used in two different ways. The first point is at the wrist. In the middle drawing (fig. 1), I’ve drawn a line from the ulna to the radius. With this angle in place, you can then “square up” the wrist, communicating to the viewer the spatial orientation of the box of the wrist. Next, just how as you would use an axis line to capture the angle between pairs of skeletal landmarks of the body, you can draw a single line to capture the position of all four knuckles of the fingers. Ask yourself if the knuckle line appears closer to the tip of the pointer finger or closer to the wrist. I recommend taking a proportional measurement and then comparing the distances while placing the knuckle line.
Active vs. Passive
Finally, in the drawing on the right (fig. 1), I’ve gestured each of the fingers and thumb. In this early gestural stage, instead of drawing both sides of the contour of each finger, focus solely on the active side (the outside of the bend) rather than the passive side where the flesh collapses to accommodate the bend when drawing. Pay particular attention to where on the knuckle line each finger projects from. Also, consider the length of each finger in relationship to the rest of the hand, as well as to the other fingers and thumb.
Keep it Simple
Gesture drawing allows you to capture the most prominent directions, forms and relationships of the hand without getting prematurely mired in details. It’s important to remember: In drawing there are no silver bullets. Drawing the hand is a challenge, and you should expect to make several attempts and revisions. If done with care, this technique allows you to capture the basic forms of the hand in proper proportion and will provide you with a solid foundation so you can build the rest of your drawing before moving forward with more detail. Here are a few three-minute hand gestures (fig. 2) relying heavily on the method just described. Remember, there’s not only one right way to do a gesture drawing, so experiment to find a process that works for you.
The Basic Volumes of the Hand
Another fundamental strategy of figure drawing is to simplify the body into its most basic volumes. Although there is no single way to do this (and it changes depending on the body of the model, the pose and the conception of the artist), it is usually a combination of boxes, spheres and cylinders.
Work Largest to Smallest
When drawing, you should always try and start with the largest forms first and work your way down to smaller forms. The largest volume of the hand is the box-like form that the fingers and thumb connect to. You can think of this box as beginning at the wrist and ending at the knuckle line (once again, ignoring the thumb). Finding the placement, proportions and spatial orientation of this box is one of the most powerful ways to begin a hand drawing.
Establish Cylindrical Segments
The fingers and thumb can be simplified into a series of cylinders with the finger tips being rounded off at the ends. Each finger has three cylindrical segments while the thumb only has two. In the drawings below (fig. 3 & 4), I began with the gesture process described above before first drawing the large box of the hand and then drawing the fingers and thumb as a series of cylindrical segments. I’ve paid particularly close attention to the ellipses of each cylinder because ellipses are what show the spatial orientation of the form.
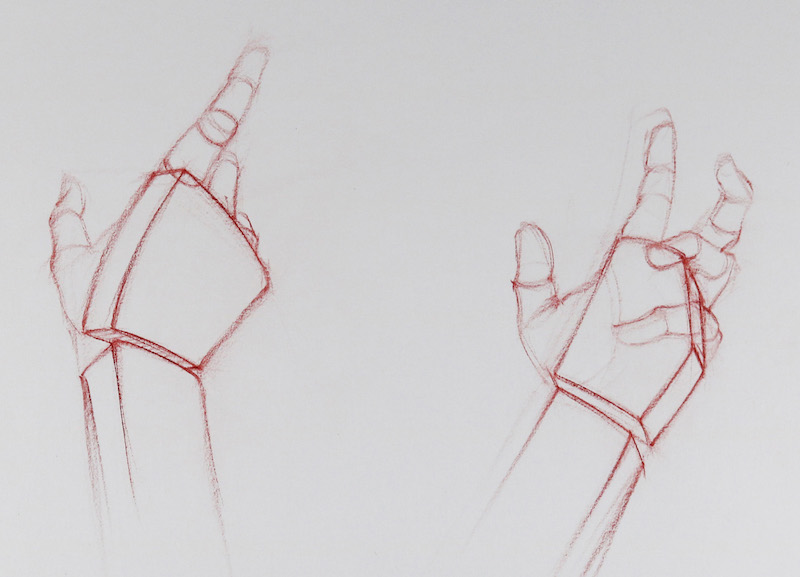
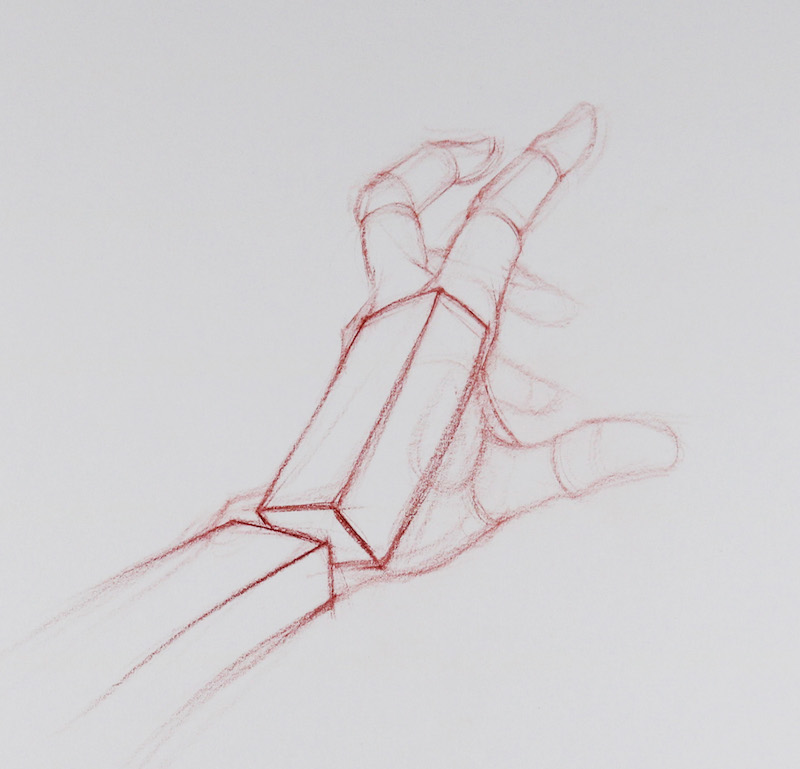
It’s important to note that the box of the hand may change shape, particularly when viewed from the palm side where the bending of the fingers may appear to alter the knuckle line. Once the size and placement of the various cylindrical segments are drawn you can gesture in any remaining details, such as the connection of thumb to the box of the hand.
Light Logic
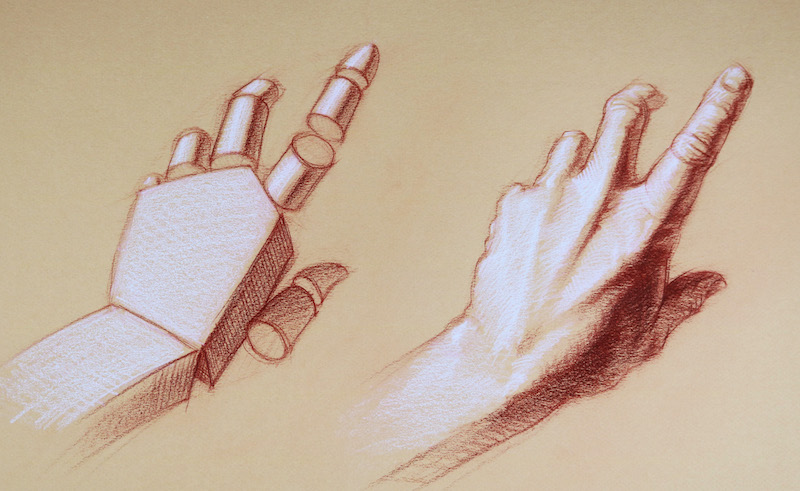
Simplifying the forms of the hand down to their foundational volumes not only helps you orient them effectively in space, but it also helps you understand the overall lighting scheme. Light interacts with basic volumes in a predictable and logical way. Once you understand the basic volumes of a subject, you understand how light falls over them.
Capture Light and Shadow
It’s important to remember that as you add details, and the light and shadow patterns become more complex, you keep the overall lighting scheme intact. For example, if you look at the tendons of the fingers, you can see that although they break up the large flat expanse of tieback of the hand, the larger lighting scheme is still dominant.

In the drawing on the left (fig. 5), the basic volumes of the hand are drawn using the strategies shared in this article. I’ve also drawn in the basic lighting scheme of these volumes. The large, flat plane of the box of the hand is getting a lot of light with the side plane going into shadow, which casts a shadow over the volumes of the thumb. Each of the finger’s cylinders has light on its left side and goes into shadow on the right. Take some time to compare these two drawings. Hopefully, you can see that even though the more finished drawing on the right contains far more detail, it still retains the same overall lighting scheme shown in the drawing on the left.
Keep Learning New Hand Drawing Techniques
Although studying the musculoskeletal anatomy of the hand is essential for successful hand drawing, the techniques you’ve just learned will get you started and ensure that, when you do add anatomical details later on, they’ll be organized with a believable framework. With numerous ways to approach hand drawing, I encourage you to learn as many as you can. I tell my students that, whenever possible, it’s best to simplify their drawing process and master the foundational skills, which include gesture drawing, volumetric drawing and light logic. Learning to adapt these familiar strategies to new drawing challenges is an excellent way to streamline your drawing process and distil complex subjects down to accessible and drawable forms.
Meet Brent Eviston
For Brent, drawing has always been his passion and primary medium of expression. After attending Otis College of Art and Design, he has continued to study many forms of drawing, including traditional master draftsmanship, architectural drafting and illustration, anatomical drawing and conceptual drawing. Brent, who founded Evolution Academy for the Arts in October 2015, has taught and held exhibitions for traditional and contemporary drawing through arts institutions and organizations across the state. He also is an Artists Network Universty instructor for the popular course, Figure Drawing Essentials, which “lays the foundation for masterful figure drawing by introducing multiple methods for approaching the subject and how to improvise with these tools for maximum effect.”
You can also learn more about Brent by visiting his website, BrentEviston.com.




this is so Amazing