Pastel Tutorial | How to Paint Light in the Landscape
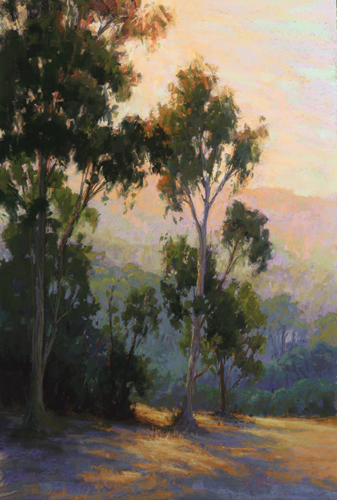
Follow along in this step-by-step demonstration by Kim Lordier on how to paint light with pastels using the notan technique, as featured in the February 2011 issue of Pastel Journal.
I like to start by first creating a notan—a practice based on a Japanese design principle that converts the pattern of light and dark into simple shapes. By doing this, I can identify the pattern and feel of the light through value—not color—early in the process. It encourages me to consider the effects of atmospheric perspective, in which the value contrast between dark and light gets less pronounced as you move further into the distance.
Color, for me, is a bit more intuitive. Local color plays a part, but in the late afternoon—when the light is warm and the shadows are primarily cool—I may intentionally push the intensity or saturation of the colors. And I look for harmonizing colors that relate to each other while maintaining the original value pattern I previously established in the notan and underpainting.
Materials

Surface: 36×24-inch sheet of Wallis Belgian Mist dry-mounted onto acid-free Fome-Cor
Pastels: Terry Ludwig and Unison primarily, as well as Sennelier, Schmincke and Nupastels (color and value are the most important to my selection, not the hardness)
Miscellaneous: Tombow Dual Brush pens in a light-, middle- and dark-value gray, and a small sketchbook (for a notan); Turpenoid and large hog bristle brushes, sizes 9 to 12 (for the underpainting); Krylon Workable Fixative (which I use if I’ve built up too much pigment and need to get back some tooth, or to wipe out a passage that isn’t working in the painting); Viewfinder

How to Paint with Pastels Using the Notan Pastel Technique

Step 1: Notan
The notan process is one of many pastel techniques. I learned it from Barry John Raybould, creator of the Virtual Art Academy. To create one, I use Dual Brush pens in three values to establish a monochromatic value structure and simplify the major shapes of my design. These notans are approximately 1×2 inches, and are done very quickly.

Step 2: Creating the Underpainting
Using the notan as a guide, I move to my Wallis pastel paper and sketch the gesture of the tree trunks first with a blue-violet Nupastel (No. 244), making sure they vary in thickness and height. I lightly lay in the shapes and angles of the distant hills, and the background trees. Then I take the side of the pastel and lightly mass in the movement of the tree shapes in the foreground, applying less pressure in the background and more pressure for the shapes in the foreground. The same is true with the shadow shapes. I then take a very dark eggplant color (a Terry Ludwig), and very lightly glaze it over the darkest shapes, mimicking the notan. Next, dipping a large bristle brush into Turpenoid—and squeezing out excess liquid on the side of the jar—I push the pastel around, using the whole of my arm to make the strokes.

Step 3: Color Application in Pastel Landscapes
I find that starting with a monochromatic underpainting makes the transition to color quite fun. I start by laying in middle-value greens in the trees, knowing that I don’t want to fill the entire shape. I want to have warmer edges on the backlit trees where the light hits, and then fill in the shapes with cooler greens, blues and purples. I lay in an intense purple in the foreground shadows, and modify the intensity with a gray-blue and a warmer red ochre. At this stage, I commit to soft edges only, using the side of the stick to produce a more brush-like effect. For the areas that I want to move back into space, I introduce cooler and lighter colors that vibrate with a change in color temperature but not a big change in value.

Step 4: The Finishing Touches
I continue to modify color and edges in my pastel landscape until the shapes are full but not overly rendered. I don’t feel compelled to fill every bit of the painting surface and love to have parts of the underpainting show through, creating textural variety when viewed closely. At this stage I begin to place the highlights on the tree trunks and make vertical marks to indicate the dry grasses. I’ll also soften a few key edges with my finger as I don’t want every edge to be of the same importance.
If you enjoyed this demonstration on pastel landscapes, then check out these two galleries! One shows paintings of sunrises and sunsets, while the other is a sun-filled gallery of pastel paintings by Christine Debrosky.
MORE RESOURCES FOR PASTEL ARTISTS
• Subscribe to Pastel Journal magazine
• Watch pastel art workshops on demand at ArtistsNetwork.TV
• Get unlimited access to over 100 art instruction ebooks
• Online seminars for fine artists
• Find pastel painting downloads, books, videos & more
• Sign up for your Pastel Journal email er & download a FREE issue of Pastel Journal magazine


Have a technical question?
Contact UsJoin the Conversation!